Wednesday 27 April 2016


First Attempts

All cracked from over work or trying to get the indent and end edge to work together.
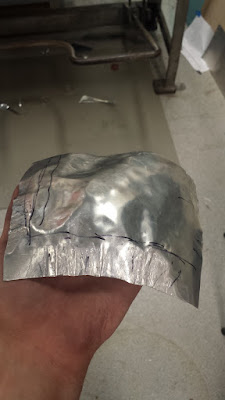
Construction- Successful Attempt


After 3 failed attempts I realised that the shape I needed to make wasn't so much of a valley but actually just a step down into the corner. This time instead of making an indent I used the mallet to flatten the corner and bowl the rest of the sheet. This created the first fold into the step. I shaped it using the shrinking machine and on the edge of the metal planishing form then finally bent the corner down to finish the shape.
Construction- Fails


For my first 3 attempts I tried to make the valley in the rock by forming the over all bowl shape then denting it in with a mallet. while this to some extent worked for the valley, it made creating the edge fold down extremely difficult to achieve. As a result of trying to force it into a shape that wouldnt work, each time the metal cracked on the edge.

Construction- Planishing


Construction- Shrinking

The bowl technique while good at maintaining a smooth surface, wouldnt bend the metal down enough (above). To solve this I instead used the shrinking machine which allowed for a much quicker molding of the metal to the required bowl shape. It however left unsightly damage to the metal which so I tired to use it less and less each time I started a new skin.

Construction- Bowl Mold


I carved a bowl out of the top of a hebel block. This was quicker to carve then wood and gave me something to bash the metal into to create the bowl shape. The technique causes ripples to form in the sheet metal as seen above which when bashed flat, causes the metal to shrink, creating a smooth bowl shape. A second longer and shallower mold allows for the creation of the longer curve across the centre of the rock.


Construction- Planning


This allowed me to reshape the skin quicker each try.
Scale

I reduced the scale of the template slightly to make it a more manageable size both for bending the
and for transportation


Tuesday 26 April 2016
Template Design

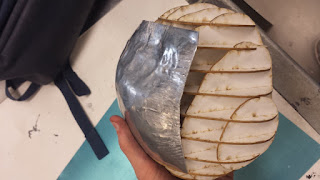
Rock Modeled in 123D Make

Arranging pieces so that grid pattern is on the face that needs to be shaped allowing for an even layout of height reference points (corner of squares) and a strong structure


Subscribe to:
Posts (Atom)